Russian Honey Cake
Also known as Medovik, this is a classic layered dessert made with 12 thin honey sponge layers stacked with a light, tangy sour cream whipped cream filling that softens the cake into a moist, melt-in-your-mouth texture as it rests. Each layer is delicately sweetened with honey for a deep caramel-like flavor, balanced by the airy acidity of the cream filling, while the exterior is finished with a cream cheese whipped cream piping that adds structure, stability, and a lightly tangy contrast without overwhelming sweetness. This traditional-style Medovik cake is best made ahead to allow the layers to fully absorb the cream, creating its signature tender, custard-like crumb and rich honey flavor, making it an elegant yet comforting dessert perfect for holidays, celebrations, or anyone searching for an authentic Russian honey cake recipe.
Loving these international recipes? Try our Pandan Khanom Chan recipe.

(approx. same as 9in 3 layer Cake) | ⏱️ Hands-on: 1 hr 30 min | 🕒 Total: 2 days
Ingredients
Laila's Tip: I highly recommend reading through the recipe before starting.
The Cake Layers
| Ingredient | Imperial | Metric |
|---|---|---|
| Wildflower Honey, divided | 1/3 Cup & ¾ Cup | 113 g & 255 g |
| Water | 1 ¾ tbsp | 26 mL |
| Granulated Sugar | 1 Cup | 200 g |
| Unsalted Butter | 14 Tbsp | 198 g |
| Eggs | 6 Large | 6 Large |
| Baking Soda | 2 ½ tsp | 12 g |
| Kosher Salt | ¼ tsp | 1 g |
| Ground Cinnamon | 1 tsp | 2 g |
| All-Purpose Flour | 4 Cups | 480 g |
| Vanilla Extract | 1 tsp | 5 mL |
The Filling
| Ingredient | Imperial | Metric |
|---|---|---|
| Full-Fat Sour Cream | 3 Cups (24oz) | 680 g |
| Heavy Cream, chilled | 4 ½ Cups | 1065 g |
| Burnt Honey, leftover | 1 ½ Tbsp | 30 g |
| Wildflower Honey | ⅔ Cup | 140 g |
| Vanilla Bean Paste (or extract) | 1 tsp | 5 g |
| Instant Pudding Mix, optional (used for stabilization) | 2 Tbsp | 18 g |
The Frosting
| Ingredient | Imperial | Metric |
|---|---|---|
| Cream Cheese, room temperature | 8 oz | 226 g |
| Powdered Sugar | ½ Cup | 60 g |
| Vanilla Bean Paste (or extract) | 2 tsp | 10 g |
| Heavy Cream, chilled | 2 Cups | 472 g |
Recipe
The Cake Layers
Make the burnt honey base
Add ⅓ cup honey to a small saucepan and place over medium heat. As the honey heats, it will begin to bubble and foam. Continue cooking until it develops a deep amber color and a slightly smoky aroma. Stir occasionally if needed, but try not to disturb it too much.Remove the pan from the heat and carefully whisk in the water. The mixture will bubble vigorously at first. Once the bubbling subsides, stir until smooth and set aside.
Setup a double boiler & prep
Bring a few inches of water to a gentle simmer in a saucepan. Set a large heatproof bowl over the pan, making sure the bottom of the bowl doesn't touch the water.In a small bowl, whisk together the baking soda, salt, and cinnamon. Set aside.
Make the batter base
Add the butter, sugar, ¾ cup honey, and ¼ cup of the burnt honey to the heatproof bowl. Reserve any remaining burnt honey (about 1½ Tbsp) for the filling. Stir occasionally until the butter has melted, then whisk until completely smooth.The mixture will cool slightly as you whisk. Once it feels warm to the touch, slowly add the eggs one at a time while continuously whisking.
Add the cinnamon mixture and continue whisking until the batter becomes lighter in color and noticeably foamy.
Add the flour & vanilla
Remove bowl from the heat. Sift the flour into the batter in several additions, whisking until fully incorporated after each addition.Stir in the vanilla extract.
The finished batter should be smooth, glossy, and easily spreadable.
Prep for baking
Preheat the oven to 375°F (190°C).Using a 9-inch cake pan or plate as a guide, trace 14 circles onto parchment paper. Place the parchment sheets onto baking trays with the marked side facing down.
Form the layers
Spread a heaping ⅓ cup of batter inside each circle (and I mean HEAPING). An offset spatula works best here. I like to spread the batter into a rough "T" shape first, then work it toward the edges for a more even layer.Continue until all of the batter has been portioned.
If you run out of baking trays, lay the prepared parchment circles on a clean countertop or other flat surface until you're ready to bake them. Do not stack them once the batter has been spread.
Bake
Bake for 5–6 minutes, or until the layers are a deep caramel-brown color and spring back lightly when touched.As soon as they come out of the oven, slide the parchment off the baking tray and onto a flat surface to stop the cooking process.
If you're reusing baking trays while they're still warm, subsequent layers may bake faster—start checking around the 3–4 minute mark.
Laila's Tip: If the parchment corners curl up in the oven, trim the corners before baking or secure them with oven-safe weights.
Cool the layers
Once the layers are cool enough to handle, carefully peel away the parchment paper.If any layers spread beyond the traced circles, trim them while they're still easy to cut.
Lay the layers flat on a new piece of parchment and allow them to cool completely before assembling. Layers can be stacked as long as a piece of parchment separates them.
Make Ahead: The layers can be stored in an airtight container in the refrigerator for up to 6 days or frozen for up to 1 month. Thaw overnight in the refrigerator before using.
Create the crumb coating
Select the two least attractive layers and return them to the oven for about 8 minutes, or until crisp and deeply golden.Allow them to cool completely before processing into fine crumbs.
Store in an airtight container until ready to decorate the cake.
Make Ahead: The crumbs can be stored using the same method as the cake layers.
The Filling
Recommended to make the same day as assembling.
Make the sour cream mixture
In a bowl whisk together the sour cream, leftover burnt honey, honey, and vanilla bean paste. Set aside.Whip the cream
In a mixing bowl fitted with a whisk attachment add the heavy cream and whip until soft peaks form. Add in the instant pudding mix and continue to beat until stiff peaks form.Combine
Fold the whipped cream into the sour cream mixture until homogenous. Set aside.
The Frosting
Recommended to make the same day as assembling.
Make the cream cheese mixture
In a medium bowl, fold the cream cheese, powdered sugar, and vanilla bean paste together until smooth.Whip the cream
In a mixing bowl fitted with a whisk attachment add the heavy cream and whip until medium peaks form — The cream should hold its shape but have floppy peaks.Combine
Add the cream cheese mixture into the whipped cream. Continue whipping until stiff peaks form and the cream holds its shape.
Assemble
Stack & layer
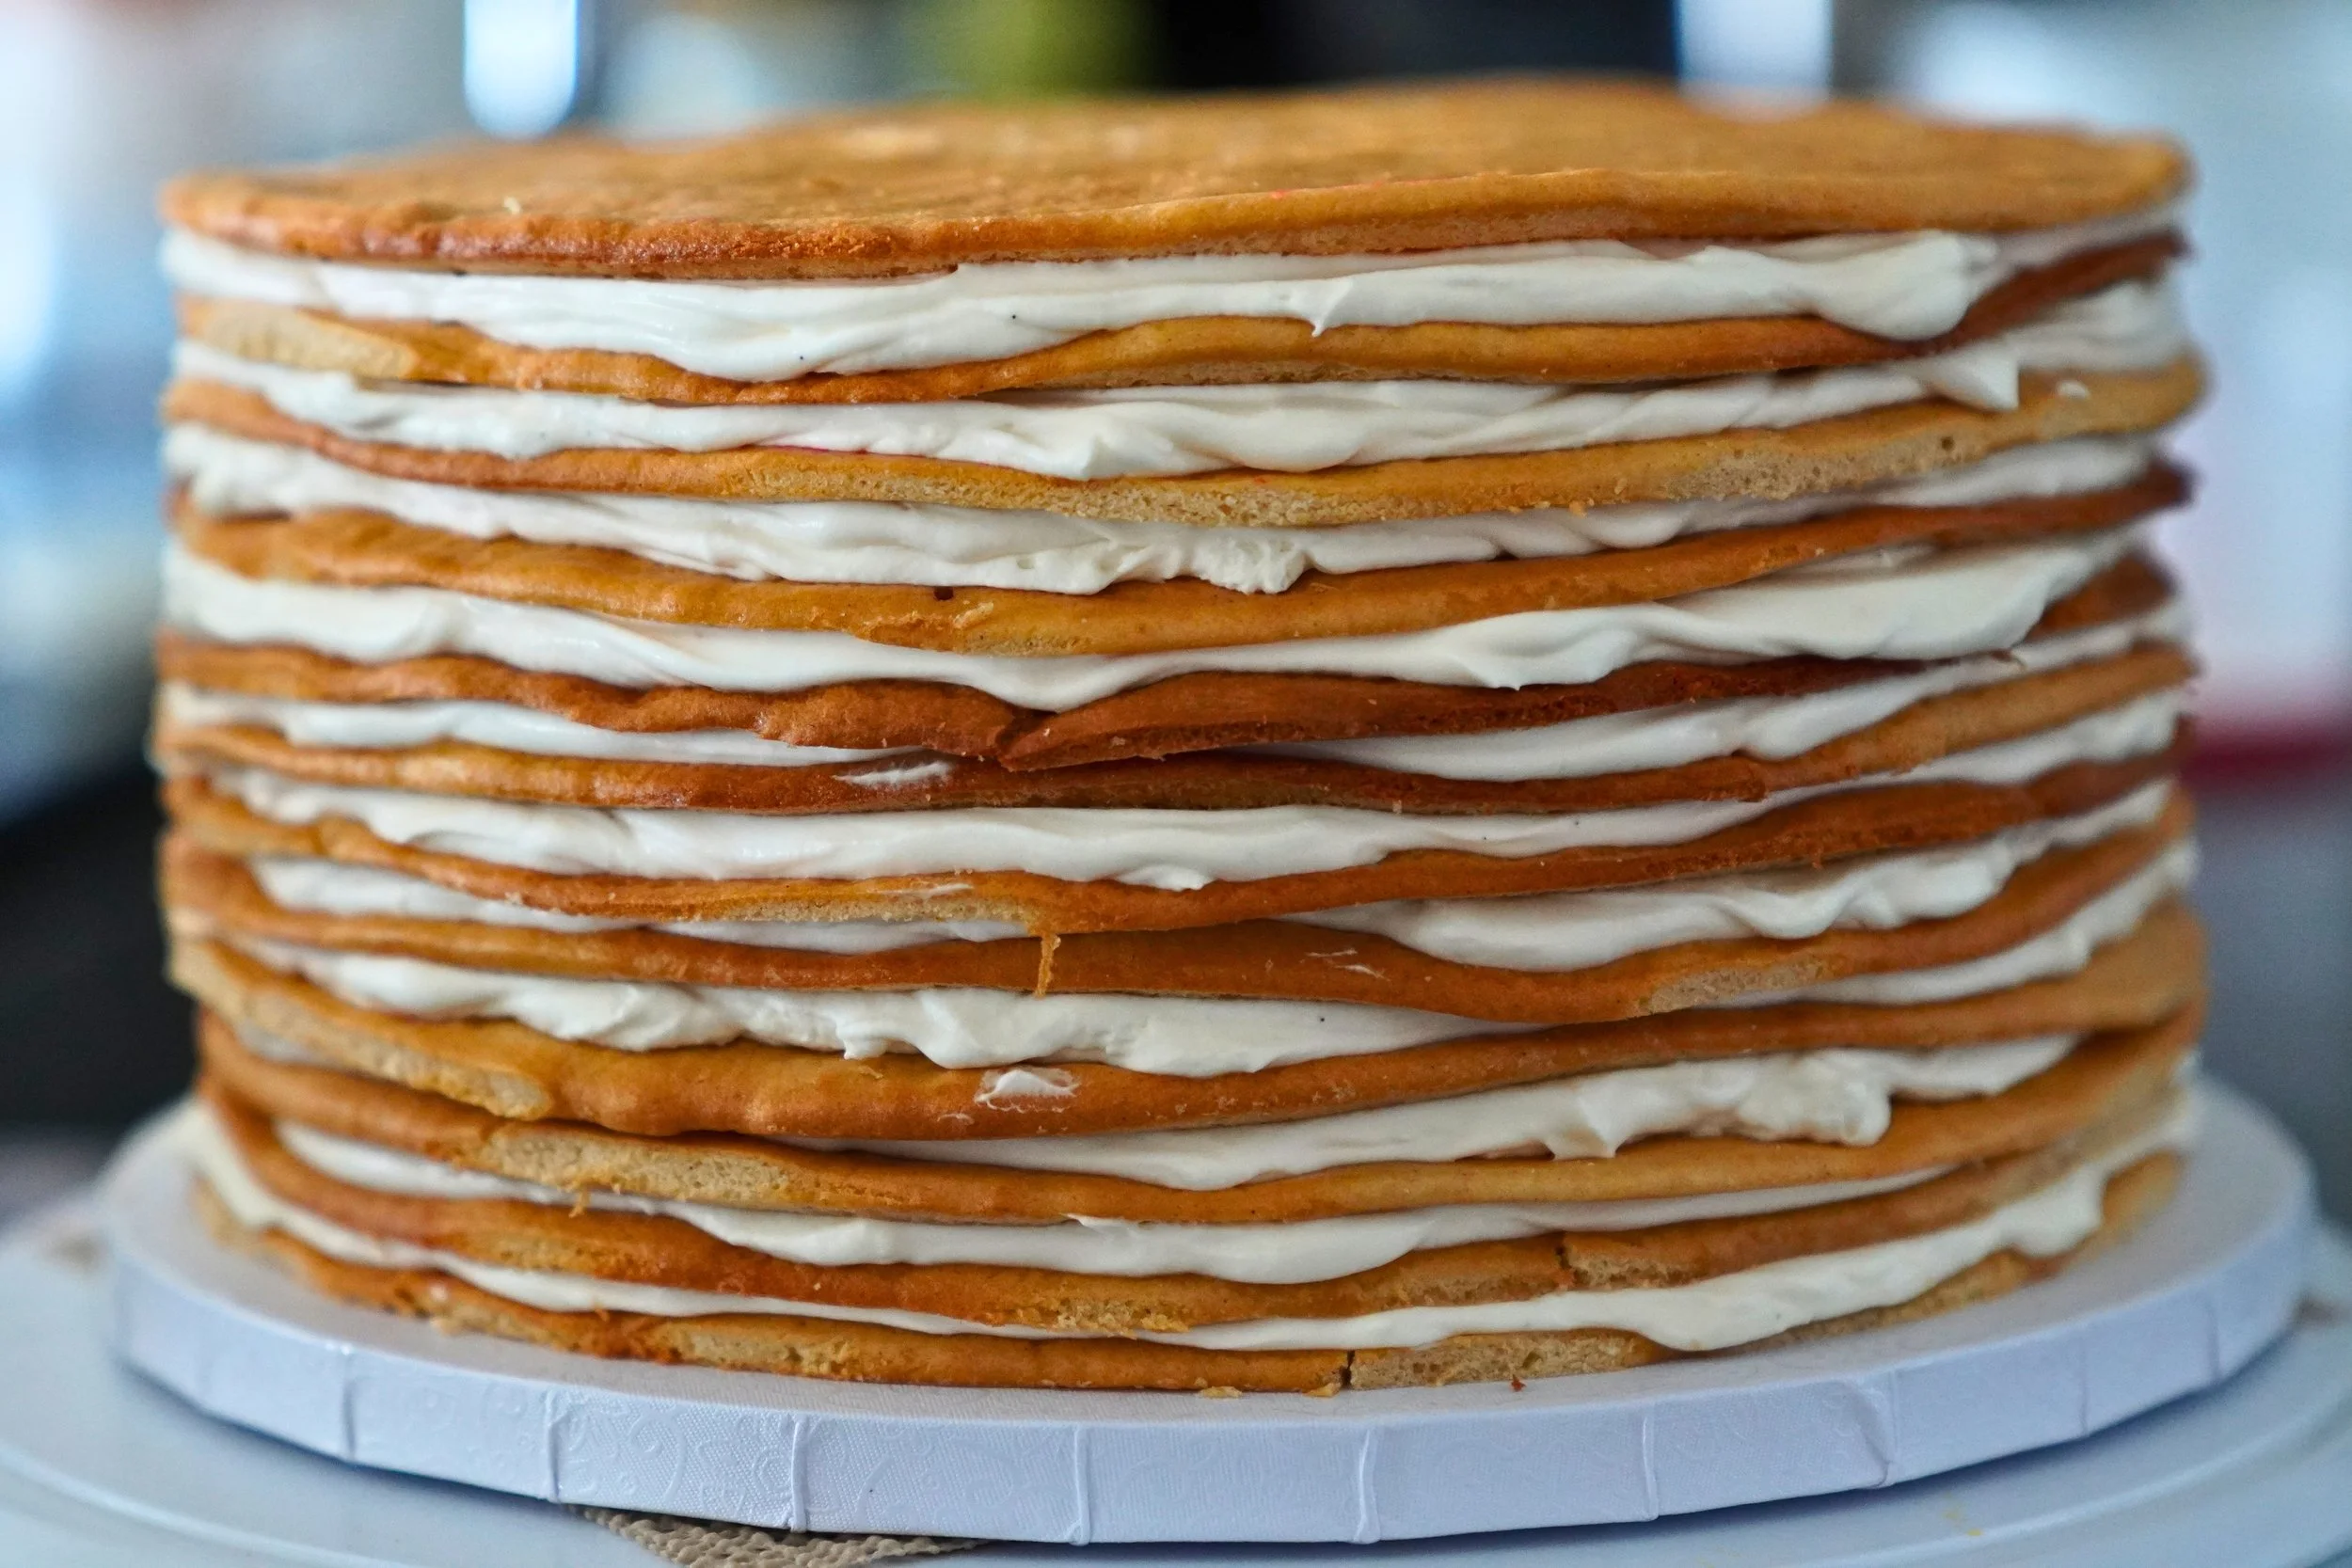
On a cake board or stand, add a small dollop of the sour cream filling. Place down the first cake layer. Spoon on 1 Cup of the filling and spread evenly with an offset spatula. Place the next layer on top then another cup of filling spread evenly across it.Continue this process until all layers are stacked. Do not add filling to the very top layer.
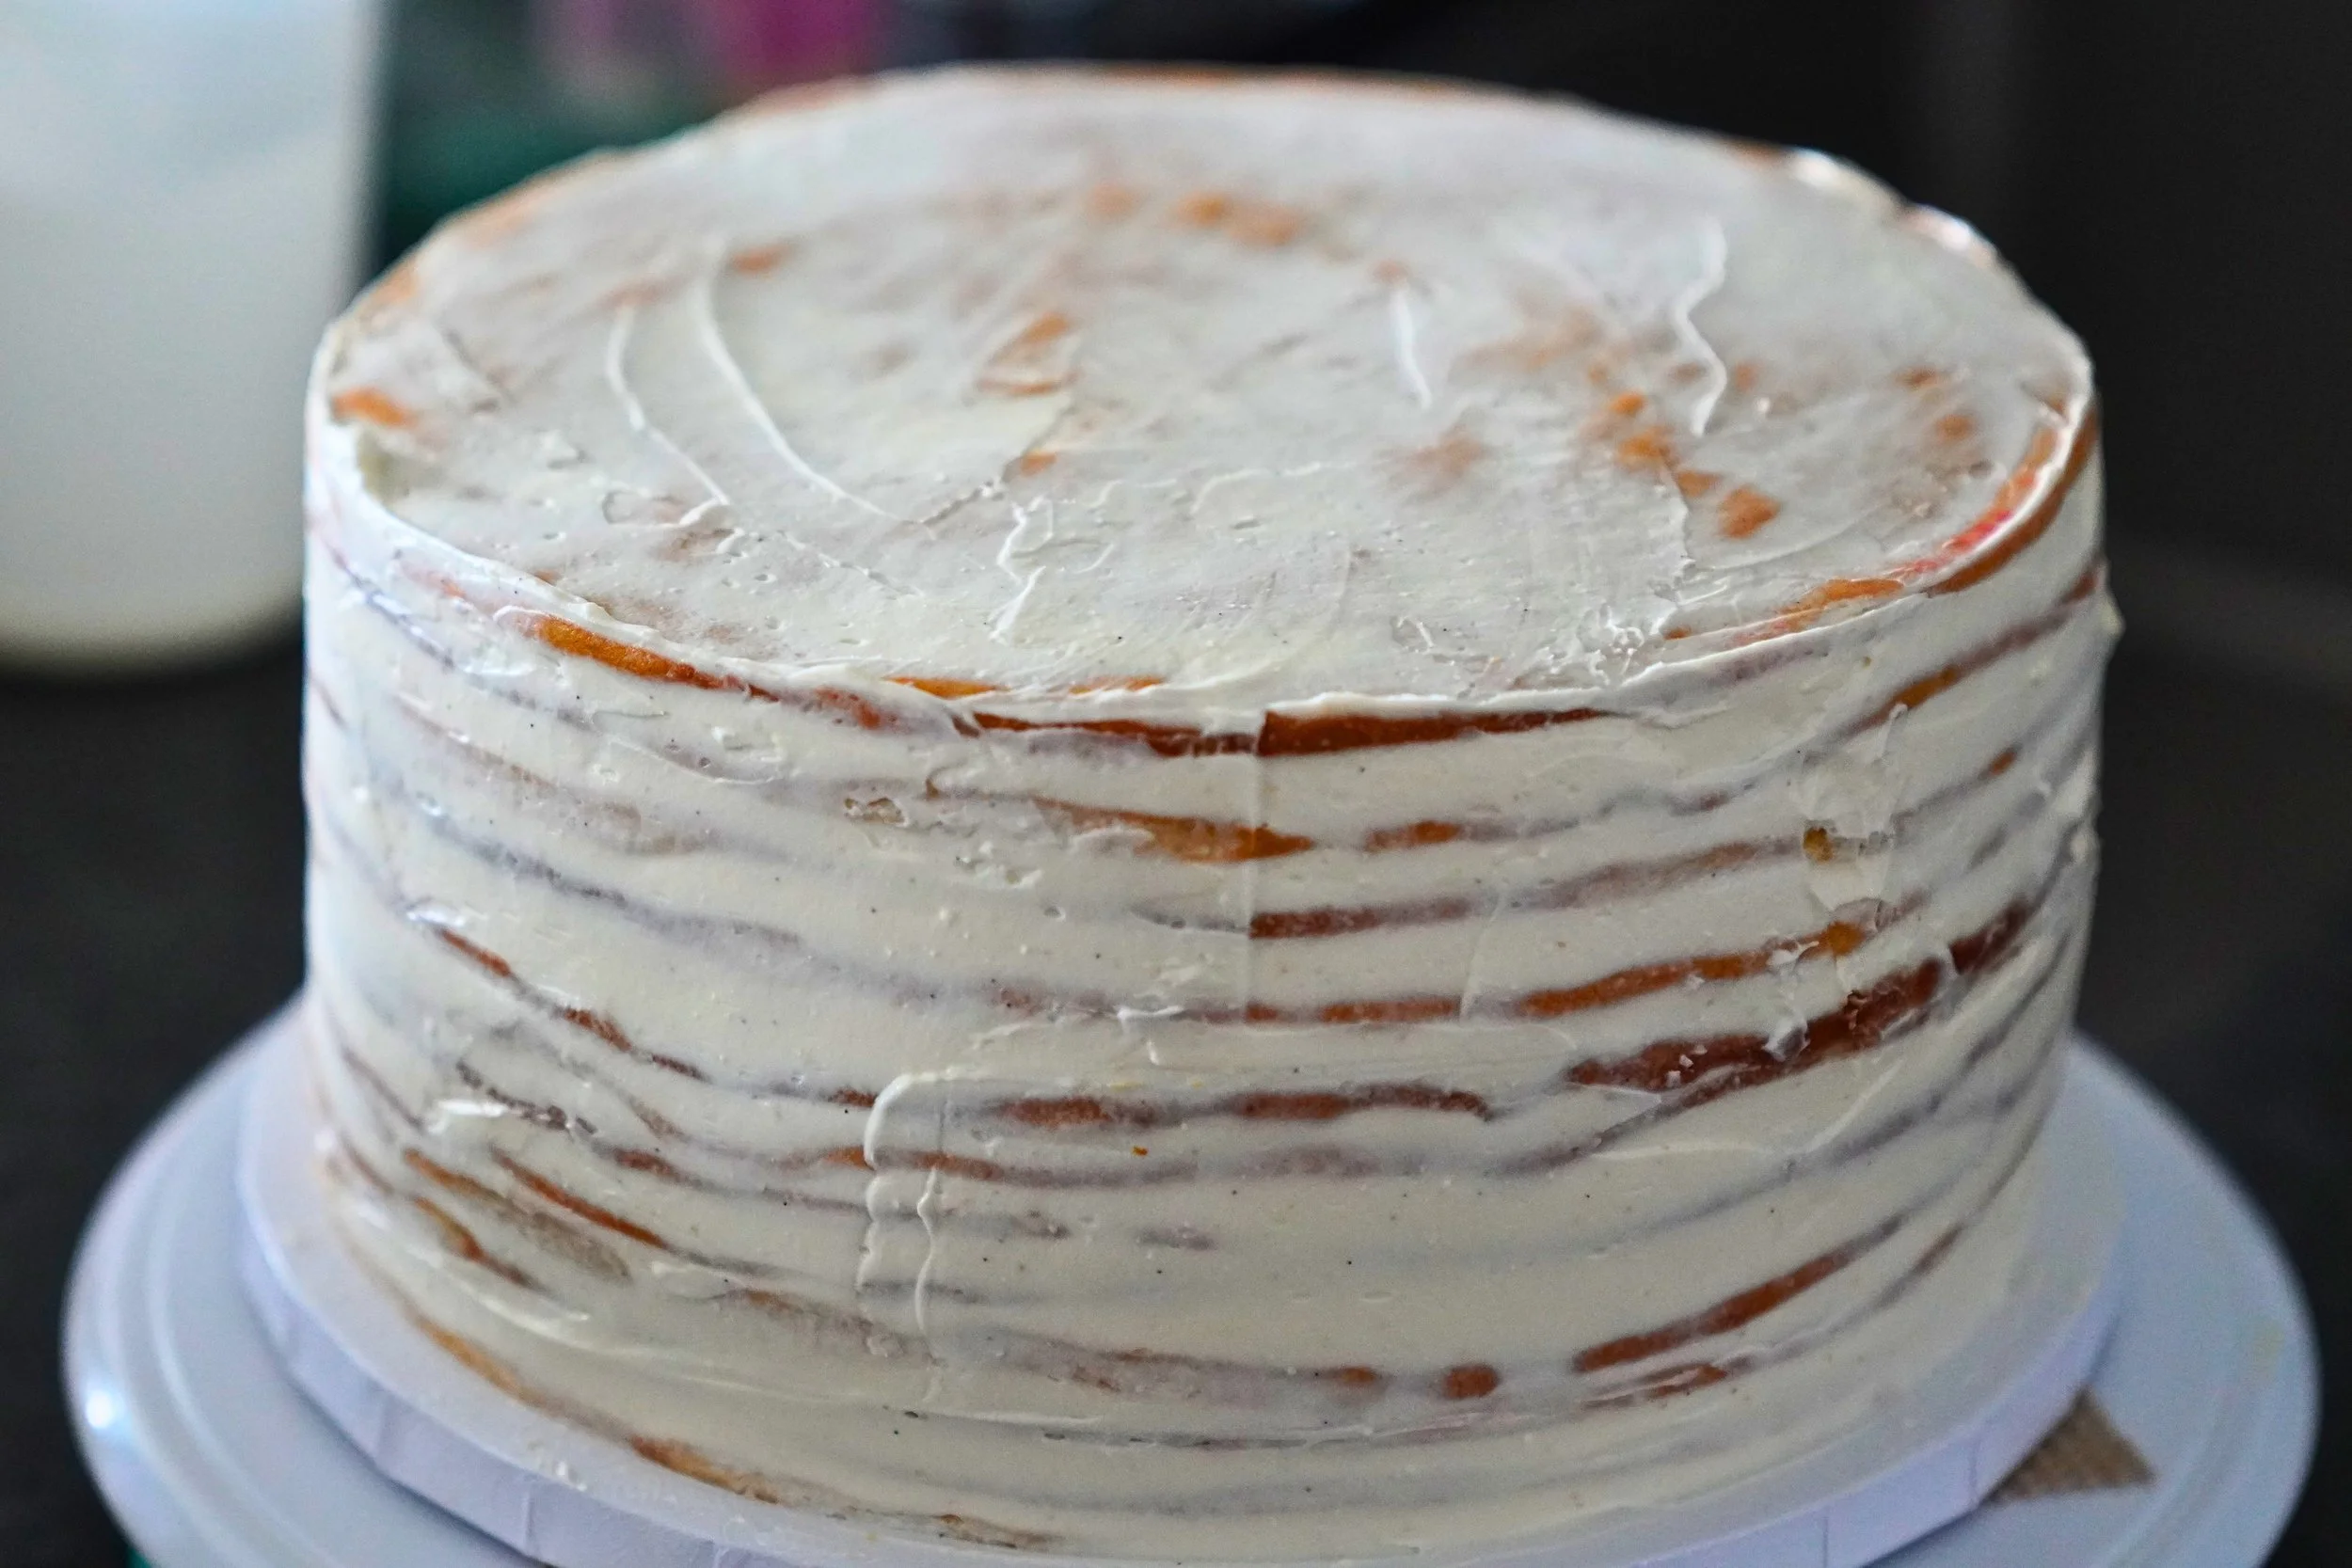
Use any remaining filling to lightly coat the sides of the cake like a crumb coat.
Coat in crumbs
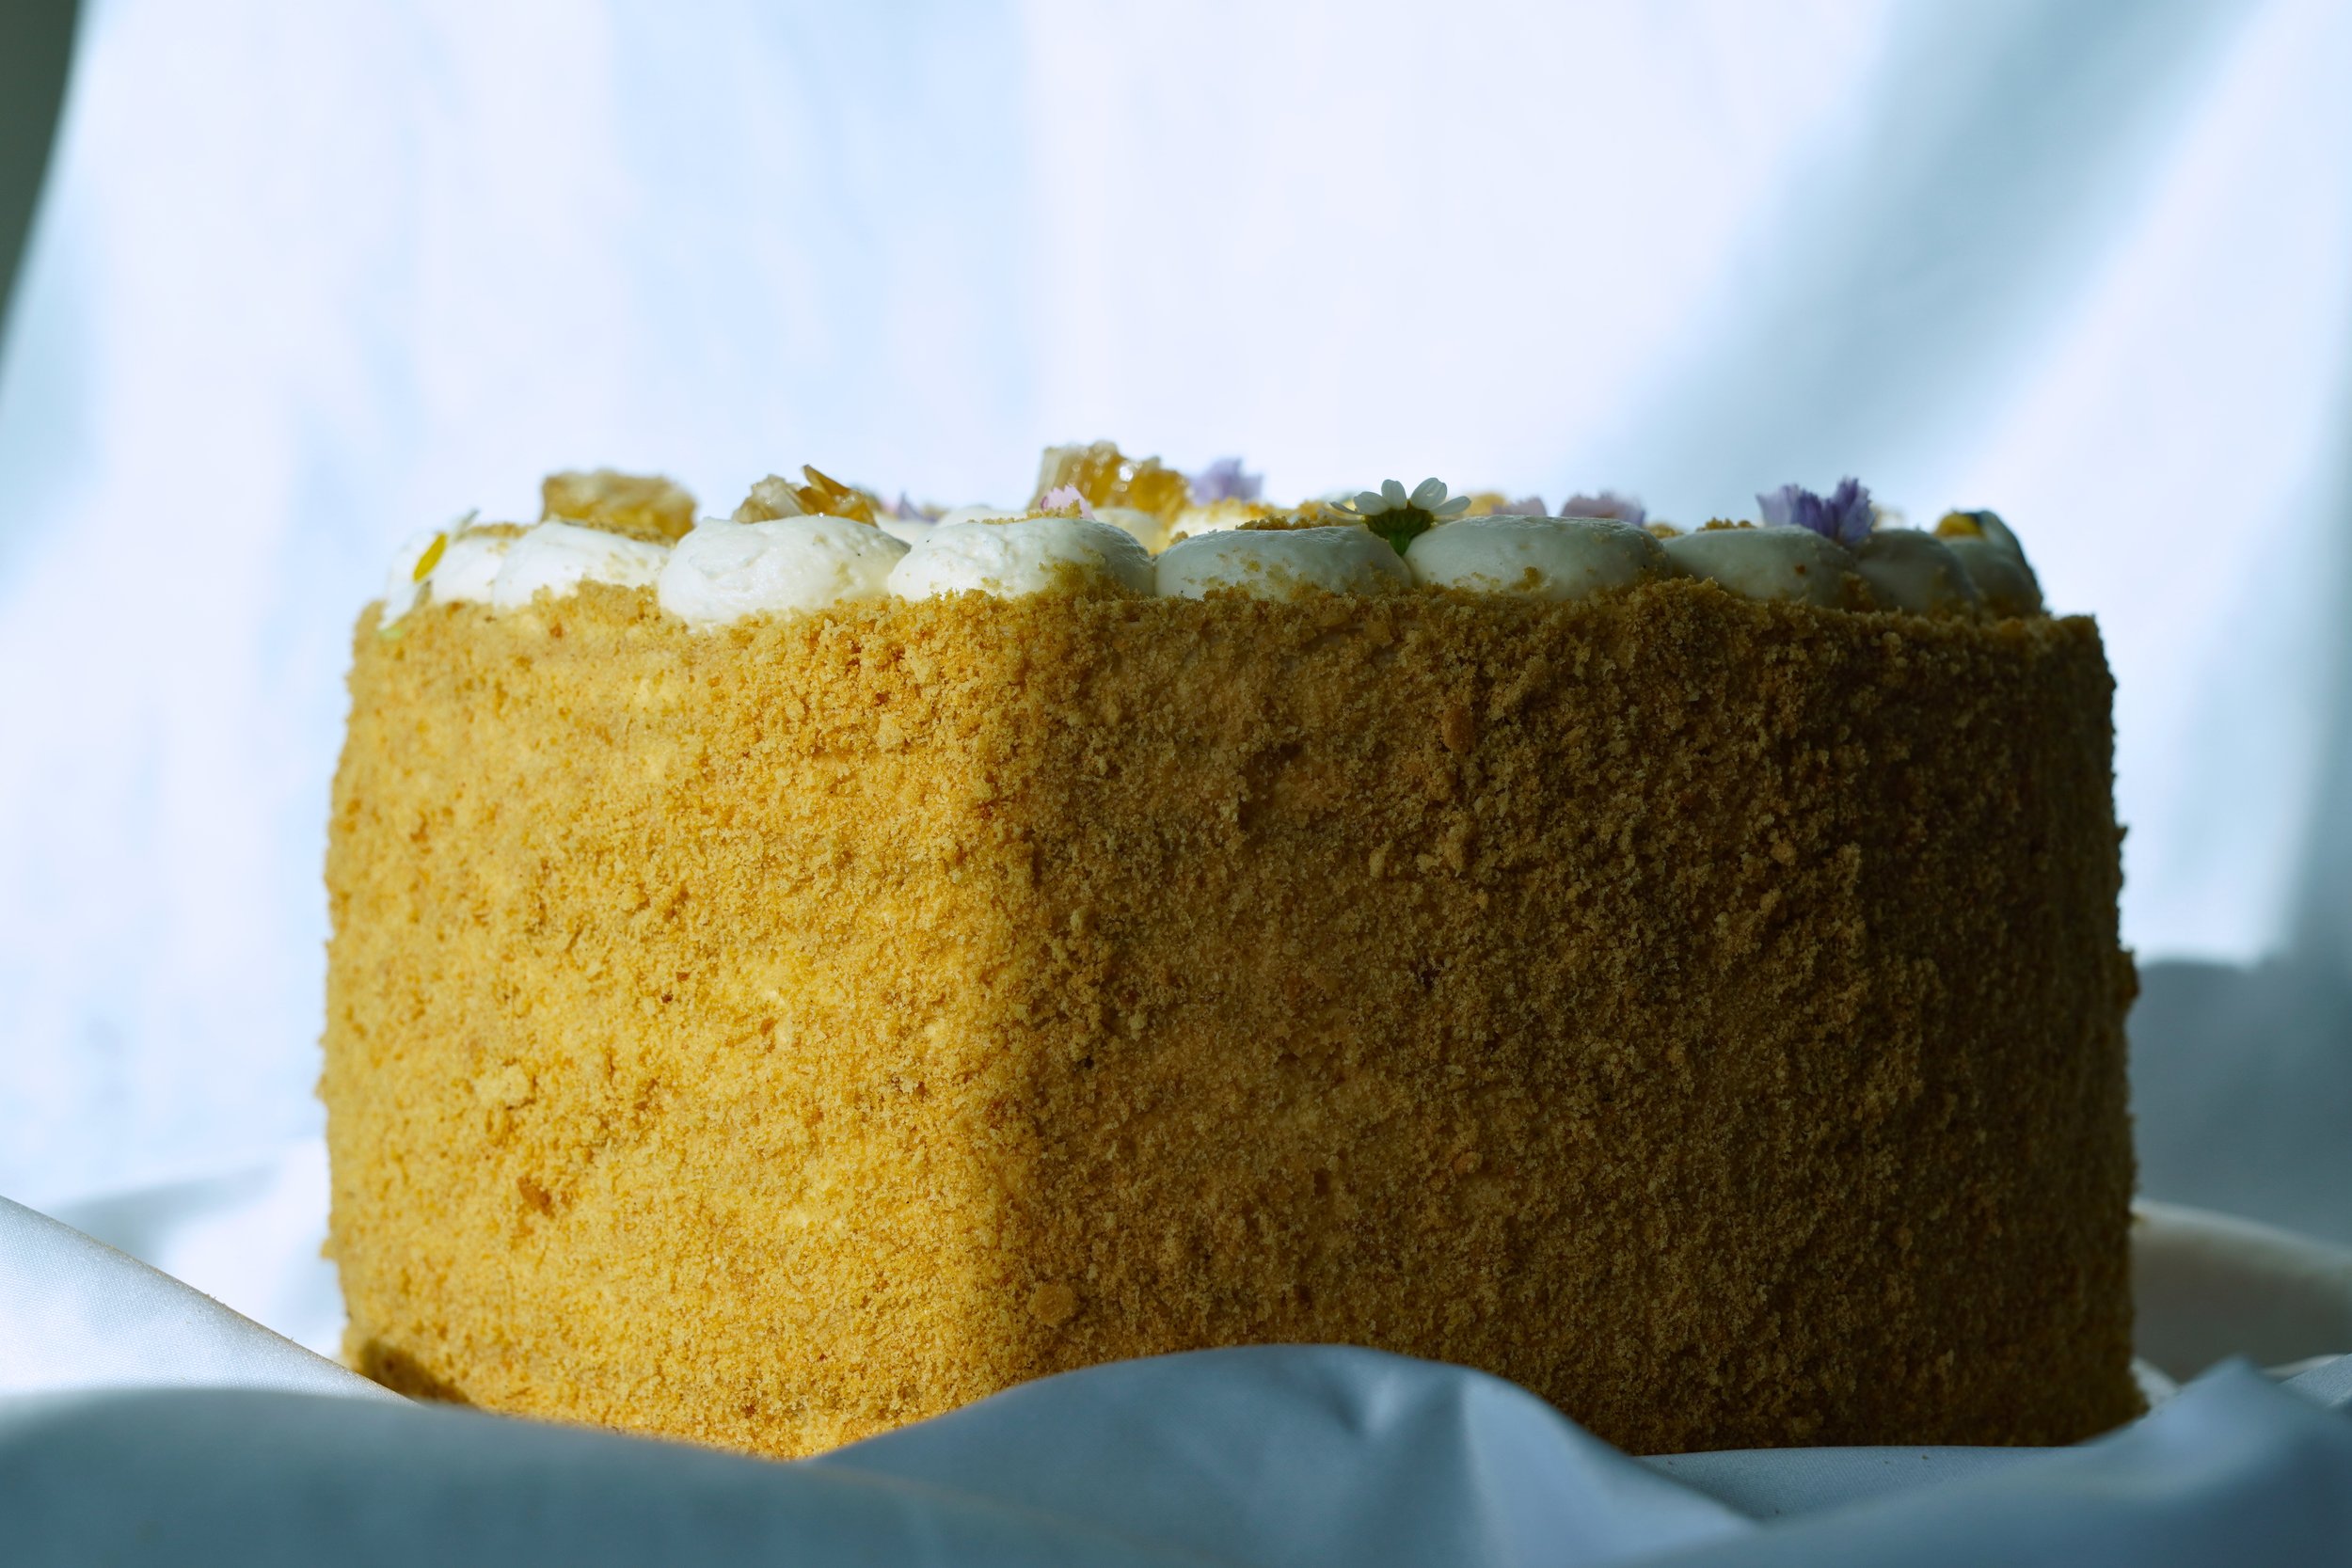
Using about ½ Cup of the cream cheese frosting evenly coat the sides of the cake.Using your hand, gently press the cake crumbs into the sides of the cake until there is an even coating all around. They should easily stick onto the frosting.
Pipe & decorate
Fill the remaining frosting into a piping bag fitted with a round tip. Pipe circle dollops in a ring around the top edge of the cake. Using an offset spatula, drag the dot toward the center of the cake to create a smeared dollop effect.Pipe another ring of dollops slightly inside the last smears. Again drag each dollop toward the center of the cake.
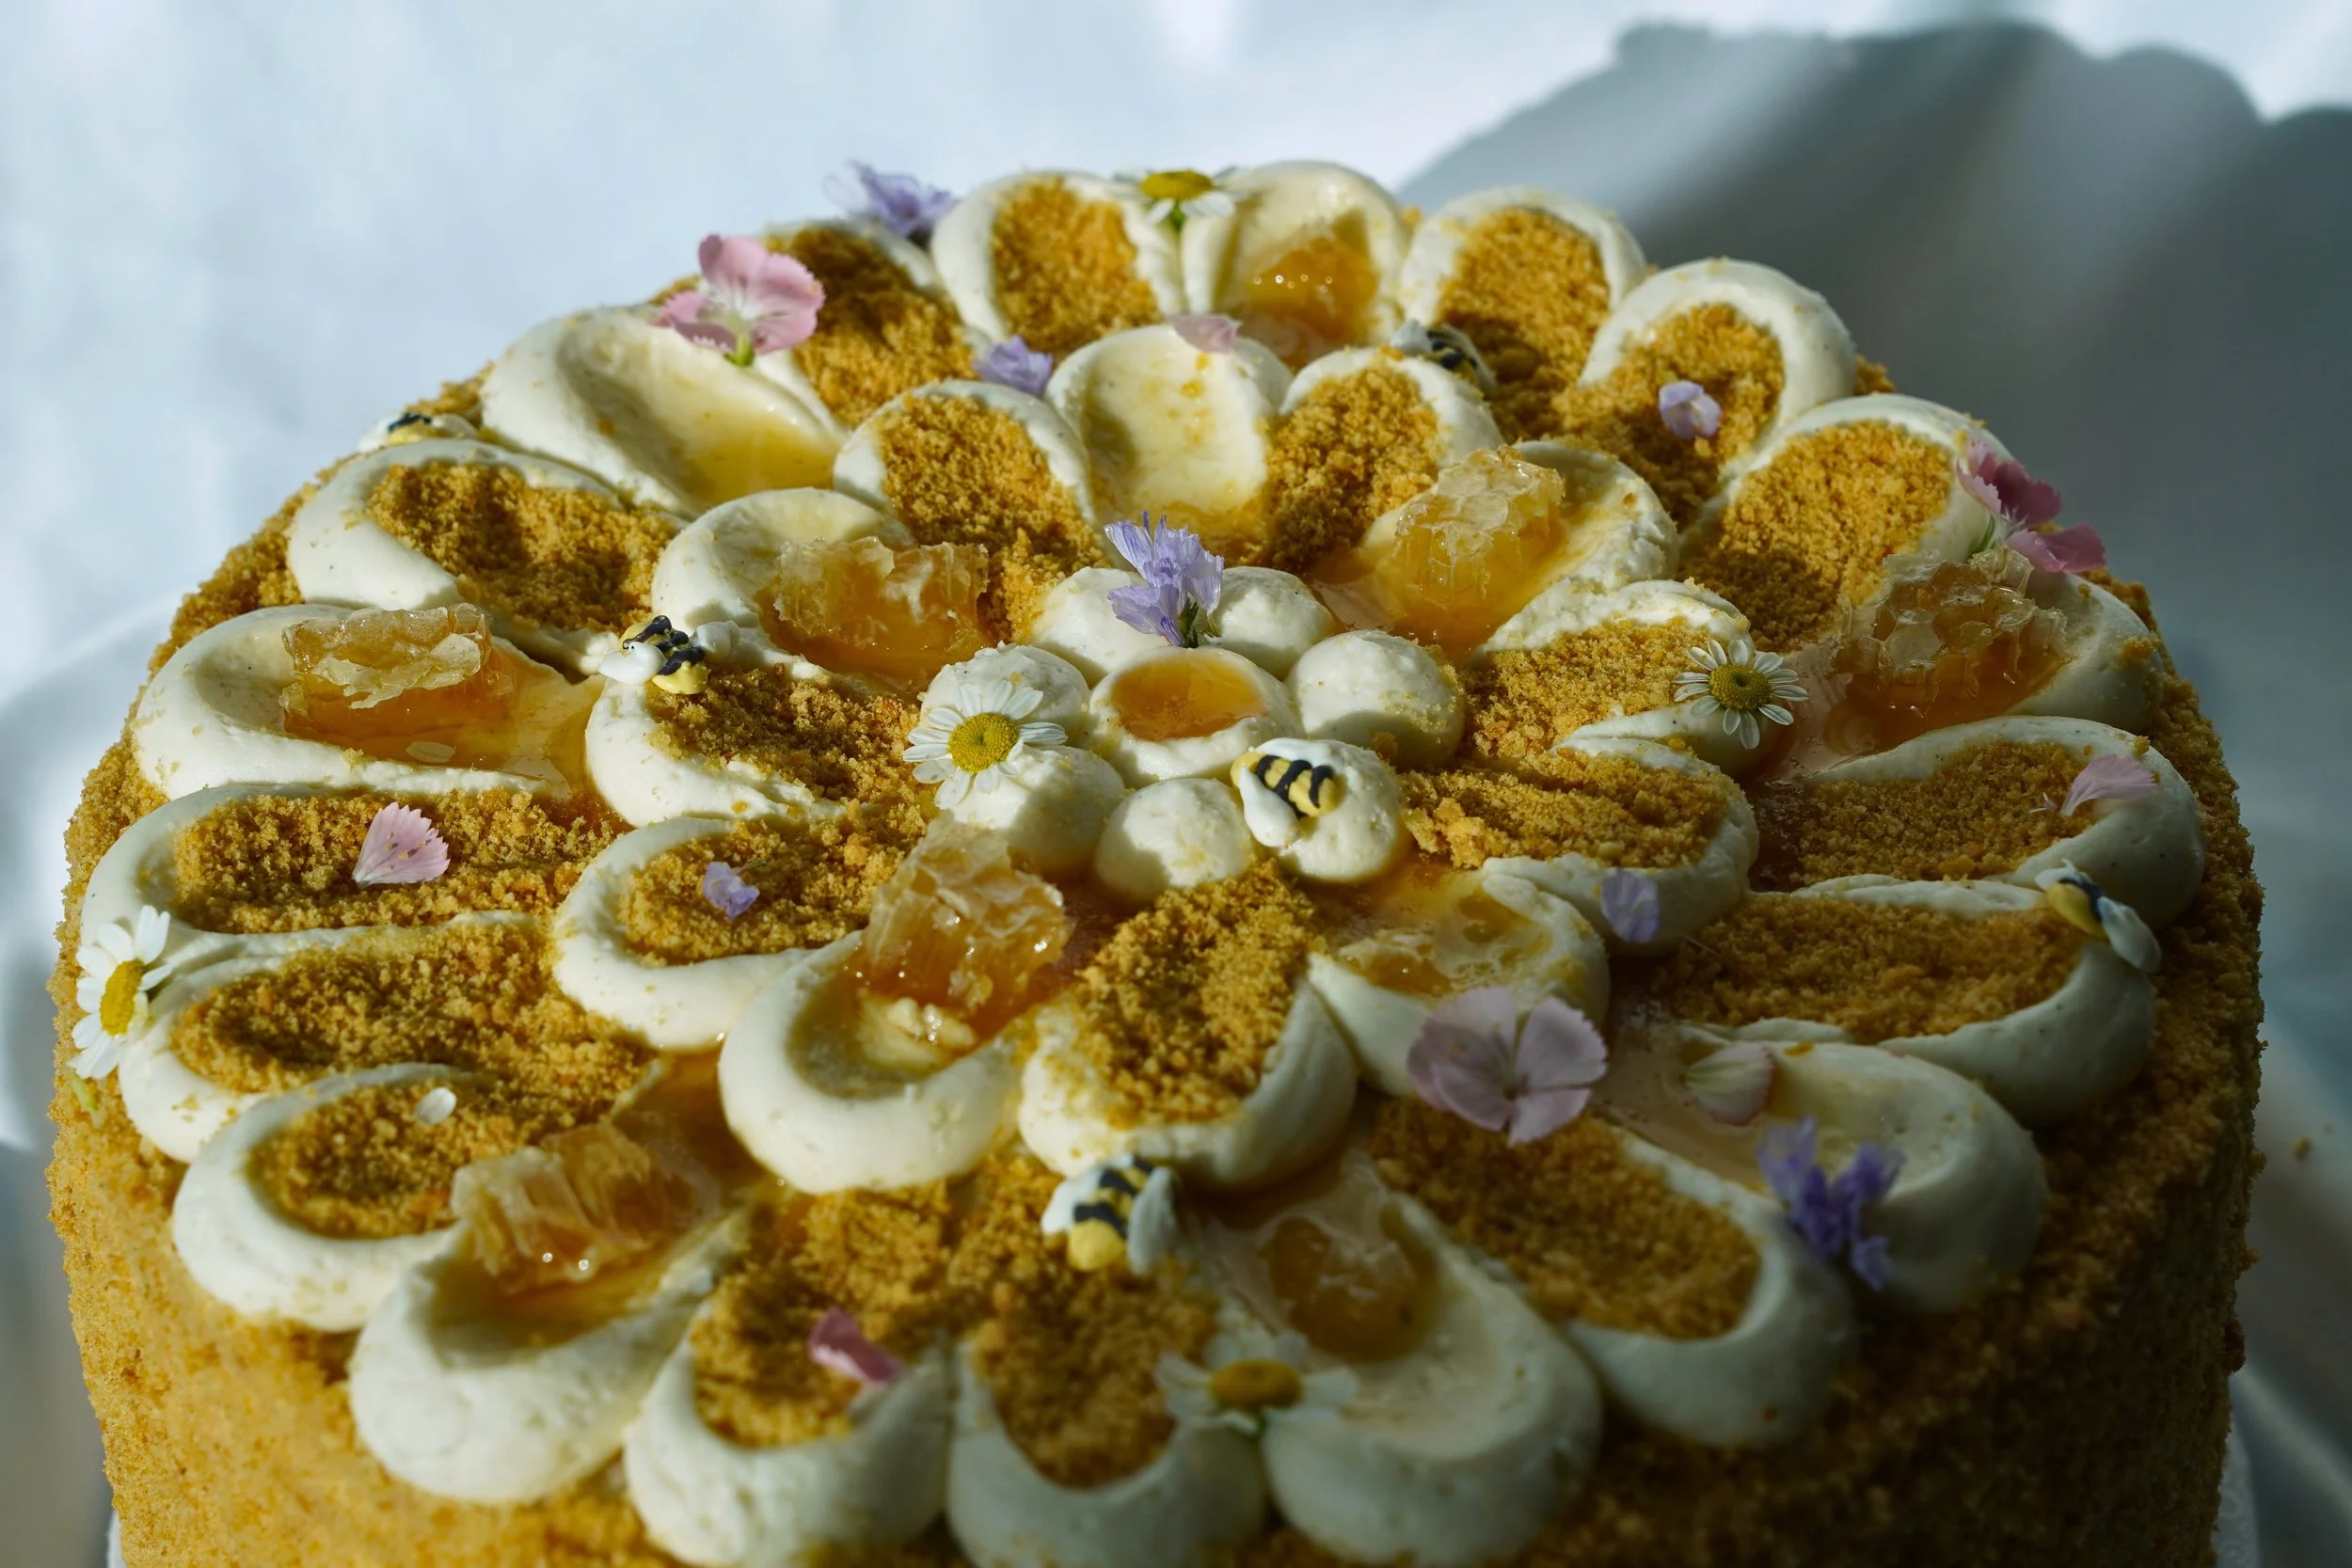
Pipe a few dollops in the center of the cake. This creates the flower like piping design.
Decorate with honey, honeycomb, edible flowers, leftover cake crumbs, and candy bees (used candy melts to make these).
Rest then serve
Cover the cake or place it in a cake box and store it in the fridge. Let it rest for 1 to 2 days before serving as this allows the filling to slightly soak into the layers creating that classic custardy texture.
🍽️ Serving: Best served chilled straight from the fridge
after at least 24 hours of resting (this is when the honey layers fully
soften and the cake becomes tender and custardy). Slice with a sharp knife
dipped in hot water and wiped clean between cuts for the cleanest layers.
Pairs beautifully with coffee or black tea.
❄️ Storage (assembled cake): Cover tightly with plastic wrap or store in an airtight cake container and refrigerate for up to 6-7 days. The texture actually improves over the first 1–3 days as the layers continue to soften and absorb the cream. Do not leave at room temperature for extended periods due to the dairy-based filling.
❄️ Storage (cake layers & crumb): Baked cake layers can be wrapped tightly in plastic wrap and refrigerated for up to 6 days, or frozen for up to 1 month. If frozen, thaw overnight in the fridge before assembling.
❄️ Storage (filling & frosting): It is highly recommended to make the filling and frosting the same day as assembling the cake to ensure the best texture is achieved. If prepped ahead of time both can be stored in the fridge for up to a week and will need to be carefully rewhipped before using.
Still have questions? Leave a comment below — or catch the step-by-step video on Instagram, TikTok, or YouTube.
Happy baking and sweet travels,
🌎 Laila from Baking Borders
Baking Borders is reader-supported. When you purchase through links on this site, I may earn an affiliate commission — at no extra cost to you. Learn more.